How to prepare for an asphalt driveway? Simple. Good driveway prep steps.
If you’ve already booked your driveway installation, most of the heavy lifting is behind you. But before the crew shows up, there’s still a bit to do on your end. A clean, accessible work area helps everything go off without a hitch and protects your property in the process.
This doesn’t mean you’re doing the job for your asphalt paving company. It’s about making sure your space is ready so the paving team can focus on laying a solid, long-lasting driveway. Here’s what to check off before they arrive.
1. Clear the Work Zone: Driveway Prep Starts Here
One of the most overlooked driveway prep steps is just clearing the space completely. Think of the driveway as a construction zone for the day.

That means anything in the way could slow things down or get damaged. So, look out for:
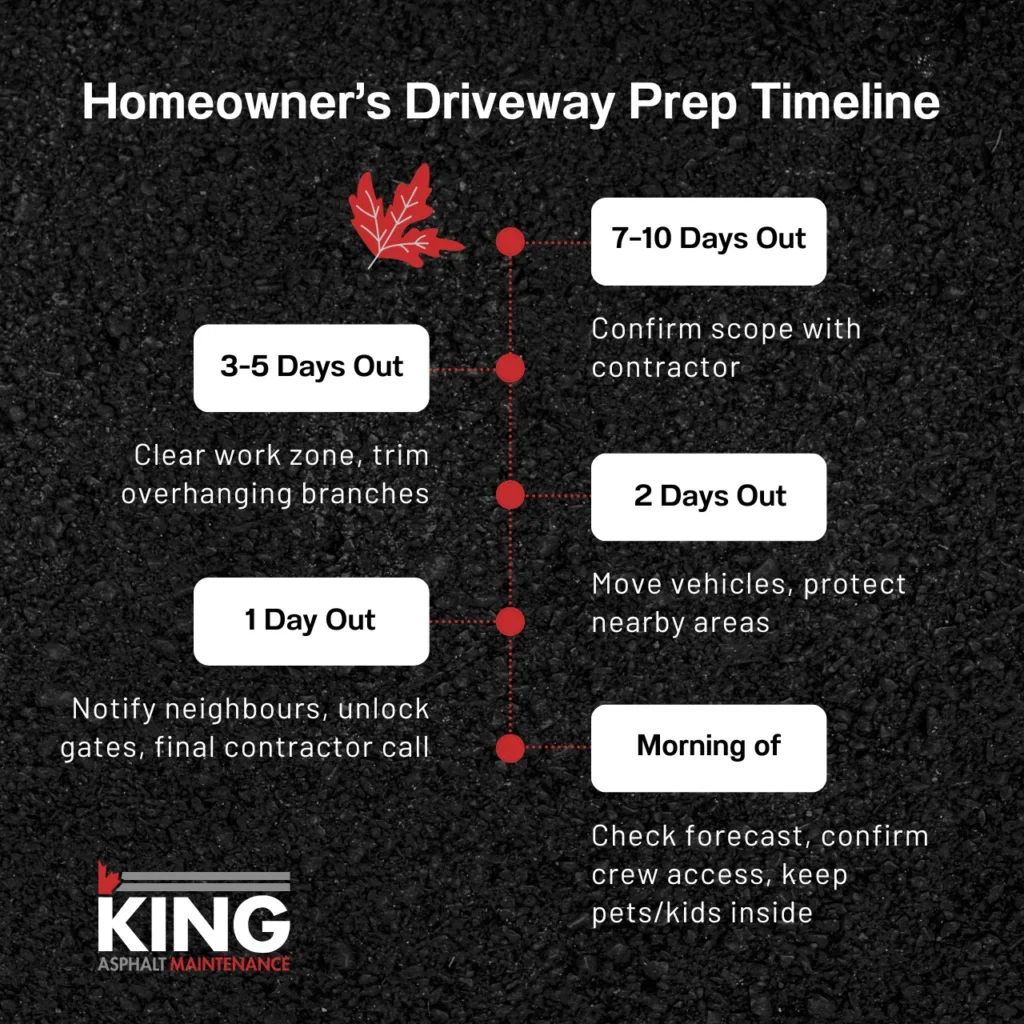
- Moving vehicles, trailers, or dumpsters out of the driveway and surrounding area
- Trimming back overhanging tree limbs or hedges that could block machines
- Removing garden gnomes, potted plants, or decorative stonework nearby
We once saw a project held up because of a large planter that needed a dolly to move, and our crew stood around waiting while the homeowner scrambled to find help. Small things can throw a wrench into tight schedules. So prepare for an asphalt driveway!
2. Make Sure the Crew Has Driveway Access
The crew won’t just be working on the driveway. They need to get to it. If you’ve got a narrow gate, a fence in the way, or anything else that might block access, it’s best to deal with it in advance.
When you prepare for an asphalt driveway, make sure the route from the street to the work area is wide enough for equipment. If a gate needs to be opened or temporarily removed, that should happen before the truck pulls up.
We’ve seen jobs where a gate couldn’t swing wide enough for the roller and the whole project had to be rescheduled. A five-minute check could save a full day of delay.
Also, consider your neighbours. If the job will block a shared driveway or reduce parking on the street, give them a heads-up. It avoids awkward conversations on the day of the pour. Or worse, finding out they had a birthday party planned and now Aunt Carol has nowhere to park.
3. Prepare for Limited Parking During Asphalt Driveway Installation
Once the driveway is paved, you won’t be driving on it for at least a few days. Possibly longer depending on the weather. So you’ll want to park vehicles somewhere else ahead of time, especially if you’ll need them for work or errands.
If your front door is typically accessed through the driveway or garage, plan a temporary route. That might mean using a side path or back door instead. It sounds small, but it makes a big difference when you’re carrying groceries in the rain.

We’ve had folks forget their second car was still in the garage and be completely blocked in after the first coat went down. A bit of planning avoids that kind of headache.
4. Removing the Old Driveway: What to Do Before Paving
Not every job starts with a fresh excavation. Sometimes, an overlay can be done right over the old surface. But if the quote doesn’t include that they need to remove old driveway materials, and your current driveway needs to come out, it’s important to have that handled before the asphalt driveway paving day.
If you’re unsure what’s included, check your contract or reach out to the contractor. Better to clarify now than scramble the day of.
🔗 Learn more about asphalt driveway paving costs and what’s included in a typical quote.
If your project includes removing the old driveway entirely, that’ll be one of the first major steps in preparing for asphalt driveway installation.
5. Check Driveway Site Grading and Drainage Before Paving
You don’t need to be an expert to spot trouble. Take a walk around your driveway after a good rain. Do you see puddles? Water pooling near the garage? Soil erosion along the edges?
Driveway site grading plays a big role in how your new driveway handles water. According to the City of Toronto’s guidelines on lot grading for infill housing, rear yard slopes should not exceed 10% to ensure proper drainage. If the ground isn’t sloped properly, water can collect in the wrong places, and that’s bad news for both your asphalt and your foundation.
These could be signs of poor slope or drainage, and while a good paving crew will account for that in the design, it helps to flag any concerns before they start. Water should flow away from the house and toward the street or designated drainage.

Also worth watching: soft spots near the edge of your driveway, especially after rain. They might indicate a poor base or erosion under the surface.
6. Confirm Paving Schedule and Prepare for Weather Delays
In Ontario, the weather calls the shots. Rain, cold snaps, or unexpected frost can delay a paving job and rushing through bad conditions usually doesn’t end well.
Your contractor should give you a window for the work, but flexibility helps. Stay reachable by phone or email, and keep an eye on the forecast. A one-day delay might mean ten extra years of driveway life.
We’ve had clients try to push ahead during a cold snap to “just get it done.” The surface never cured right, and they were calling us back six months later to fix frost heaves.
7. What to Ask Before Your Asphalt Driveway Is Installed
Don’t assume anything. It’s worth checking:
- What time does the crew plan to arrive
- How long will the job take
- How much space do they need (both on your property and the street)
- What happens afterward: sealing, curing time, and any next steps

Even a quick 10-minute call can clear up a lot. The more you know now, the smoother the day will go. Fewer questions, fewer surprises, and no need to Google “what does asphalt curing mean” mid-install.
8. Protect Your Property During Asphalt Driveway Prep
Beyond clearing the area, think about what’s next to the work zone. Will the roller brush up against your lawn? Could crushed stone spill into the flower beds?
A few ways to stay ahead of it:
- Mark sprinkler heads or low-voltage lighting with small flags
- Lay plywood over grass near tight corners or curves
- Let the crew know if there’s underground wiring or drainage pipes nearby
This isn’t a war zone, but it is heavy equipment rolling in and out. A little foresight saves on cleanup and costly mistakes when you prepare for an asphalt driveway.
Common Mistakes to Avoid When Preparing for a New Driveway
We’ve seen it all. Here are a few things that tend to get missed:
- Forgetting to move the second car from the garage
- Leaving the dog outside, thinking it’ll “stay in the yard”
- Assuming kids can bike around while work is happening
- Not realizing the front step may need edge clean-up after paving
You don’t need to be perfect, but you need to be ready. And a little heads-up goes a long way.
Your Project Starts with a Solid Foundation
Every great driveway starts before the first truck shows up. A bit of early prep keeps things safe, efficient, and frustration-free.
If you’re unsure about site access, needing to remove old driveway materials, or what’s expected before paving day, reach out. We’ll walk you through it. No pressure, just honest answers.
Still have questions about how to prepare for an asphalt driveway installation? Request a free quote or give us a call to talk through your site prep questions.
Asphalt Driveway Prep: Common Questions Answered
What should I do before paving my driveway?
Start by clearing the area, checking for drainage issues, and making sure the crew has easy access. If the old driveway needs removal, confirm it’s scheduled. It’s also smart to move vehicles, protect nearby landscaping, and talk to your contractor about the timeline.
Do I need to be home when my driveway is being paved?
Not necessarily, but it helps. If you’ll be away, make sure everything’s prepped: gates open, cars moved, and the crew has clear instructions. A quick call beforehand keeps everyone on the same page.
Can I pave over my old driveway?
Sometimes. If the base is still in good shape, an overlay might be possible. But if there are cracks, drainage issues, or shifting, a full removal is usually the better call. Your contractor should walk you through it.
How long before I can park on my new asphalt driveway?
Typically 3 to 5 days but longer if the weather’s cool or damp. Walking is usually okay after 24 hours, but check with your paving crew for the green light before pulling in.